Video content
0:00 – Start
0:08 – Bouillon Maggi Cubes Recipe
3:01 – Garlic Gold Seasoning Nuggets (Granules) Recipe
4:08 – Easy Homemade Mushroom Salt Recipe
✅ Bouillon Maggi Cubes Recipe
● potatoes - 4 pcs.
● water
● sweet bell pepper - 1 pc.
● carrot - 2 pcs.
● onion - 1 pc.
● celery stalks - 2 pcs.
● garlic - 6 cloves
● parsley root - ½ pc.
● zucchini - 1 pc.
● olive oil - 70 ml
● parsley - 10 branches
● salt - 4 tbsp.
● paprika - 1 tbsp.
✅ Garlic Gold Seasoning Nuggets (Granules) Recipe
● garlic - 2 heads
● olive oil - 50 ml
✅ Easy Homemade Mushroom Salt Recipe
● white mushrooms - 1 kg
● salt - 80 g
● dried dill - 3 tsp.
● coriander powder - 1 tsp.
Ingredients
Pasta
1 batch of my Homemade Pasta, recipe in my book
or
250g/8.8oz Dried Pasta (egg free)
Sauce
2 tbs Olive Oil
2 Shallots, finely chopped
2 cloves of Garlic, minced
100g/3.52oz Gaz’s Bacon, cut into small cubes
Small handful of Fresh Parsley, lightly chopped
1 cup/240ml Vegan Cream
3 tbs Nutritional Yeast
1/2 tsp White Miso Paste
1 tsp Cracked Black Pepper
1 cup/150g Frozen Peas (optional)
Garnish
Fresh Parsley
Method
Pre heat a large saucepan over medium heat & add the oil.
When the pan is hot add the shallots & garlic. Sauté until softened & lightly golden. Then add the bacon & parsley.
Bring a large saucepan of lightly salted water to a boil. Add your pasta and cook to the packet instructions.
Cook the mix whilst stirring for about 2 more minutes then turn the heat down low.
Add the cream, miso, nutritional yeast & a pinch of seasoning.
Add the peas.
Let the sauce thicken for a few minutes.
Drain your pasta from the water & add it to the saucepan.
Stir the pasta making sure it’s coated in the sauce.
Serve straight away with chopped parsley
Source: https://www.avantgardevegan.com/recipes/best-ever-vegan-carbonara/
5:21 PM
No comments
Ingredients
For the dough
300 g flour
125 g butter
1 tablespoon powdered sugar
1 pinch salt
100 ml white wine
2 egg yolks
5 g fresh yeast
Poppy seeds filling
175 g ground poppy seeds
90 g sugar
1 tablespoon honey
1 tablespoon raisins or other dried fruit
1 tablespoon bread crumbs (I used whole)
90 ml water
lemon zest / orange
vanilla
Walnut filling
150 g ground walnuts
80 g sugar
2 tablespoons breadcrumbs (white)
1 tablespoon honey
1 tablespoon raisins or other dried fruit
125 ml water
peel of lemon / orange
vanilla
Apple filling
375 g apples peeled, grated
2 tablespoons raisins or other dried fruit
1 tablespoon ground nuts
1 tablespoon breadcrumbs (white)
cinnamon
Prune stuffing
1 jar of plum jam thick
Preparation
Dough
Place all ingredients in a bowl and knead until dough is elastic and non-sticky.
Then put it in a bag and refrigerate.
Meanwhile prepare the fillings.
Poppy seeds filling
Place in a saucepan of water, sugar and honey and let it on the stove top, until the sugar has melted.
In a bowl, place the dry ingredients, then pour hot water over them (with sugar and honey) and mix well.
Walnut filling
Follow the same procedure above.
Apple filling
Mix all ingredients.
After making the fillings remove the dough from refrigerator and divide it into 5 equal balls, then spread each on trays of 22 cm diameter cake.
Pierce with a fork three of the stretched round shapes of dough and bake them in round baking pans that were previously coated with oil and sprinkled with flour, for 8 minutes at 180C/360F, until they brown.
After you have baked the three tops, take one of the sheets that was not cooked (raw sheet) and lie it in a 22 cm cake pan, pierce it with a fork, then add the Poppy seeds filling over it and level it.
Over Poppy seeds filling place one of the baked sheets and then, on top, place the Walnut filling and level it.
Over the Walnut filling place 2nd baked sheet, pressing gently, and then, on top, place the plum jam / jam and level it.
Place over the Plum jam the 3rd baked sheet, top it with the apple filling, then level it and, at the end, place over it the second unbaked sheet, then pierce with a fork and put it in the oven preheated to 180C/360F for 50 minutes.
Remove from oven and powder sugar over it.
Recipe from Oana Silion
9:22 PM
No comments
Ingredients:
1 cup powdered sugar or icing sugar
3/4 cup Almond Flour (Ground/Powder)
2 egg whites room temperature
1/4 cup granulated sugar
Your choice of Food coloring (optional)
Lemon Yoghurt Buttercream Filling:
2 egg yolks
1/4 cup granulated sugar
1 tbsp Yoghurt
100g or 7 tbsp softened unsalted butter
1 tbsp lemon juice
For my first attempt, I think it is not a very difficult to make confectionary in contrast to what I've heard about the many pitfalls of the Macarons shells making process. The ingredients I would say is quite easy to obtain. The Almond flour is rather an expensive item as here in Tallinn, they can be found at 300grams for 6 Euros! I've bought one kilogram at once and I think I will make a lot considering how wonderfully these Macarons melts in your mouth! It is truly a great creation by the Italian Chef of Catherine de' Medici in France.
However, it could be because of the freshness of the eggs (the way the meringue is made), because of the humidity, the dehydration timing to create a 'skin' for the formation of the 'feet', the oven's heat distribution, the success of the macaron can be different. That makes the making of Macaron challenging
This is one of the best 'How To Make French Macarons' video recipe. It is very easy to follow and it uses only 2 eggs, and yields about 50 Macarons shells.
French Macarons:
Have ready three baking sheets (make sure they have flat bottoms (no warping) lined with parchment paper. To make all the Macarons the same size, there are basically 2 methods.
I am using the Silicone Baking Sheet for 42 Heart-Shaped Macarons. The dimension of the baking sheet is 40 x 30cm and it has 42 heart-shaped marks. The dimensions of each mark: Length 3.8 x Width 3.5 cm. Each turn of baking in my case is about 36 because my oven baking tray is not allowing the entire Silicone Baking Sheet to sit in.
It is possible to just bake on parchment paper. So the second method is simply to draw 20 circles (3 cm diameter) and spacing 5 cm apart and turn the paper onto the next side to guide you for piping the Macaron shells.
Preparation of Macaron Shells:
- Place the ground almonds and confectioners sugar in a food processor and process until finely ground (about 1 - 2 minutes). Sift the mixture to remove any lumps.
- In the bowl of your electric mixer, fitted with the whisk attachment (can use a hand mixer), beat the egg whites and a few drops of lemon juice, on medium speed until foamy.
- Gradually add the granulated sugar, and continue to beat, on medium-high speed, until the meringue just holds stiff peaks (when you slowly raise the whisk the meringue is straight up, no drooping, called a 'beak') *Be aware to not overmix the meringue or it will 'break'.
- Then, in three additions, sift the ground almond/sugar mixture over the meringue. When folding, cut through the meringue and then fold up and over, making sure to scrape the bottom and sides of the bowl.
- Once the almond mixture is completely folded (called macaronage) into the meringue (the batter will fall back into the bowl in a thick ribbon) it is time to pipe the Macarons.
Piping of Macaron Shells:
- Fill a pastry bag, fitted with 1/2 inch (1 cm) tip, with about half the batter. Pipe about 3 cm rounds onto the parchment paper, using the circles you've drawn as a guide.
- Then gently tap the baking sheet on the counter to break any air bubbles (can also break air bubbles with the end of a toothpick).
- Let the Macarons sit at room temperature for about 30-60 minutes (depending on the temperature and humidity of your kitchen) or until the tops of the Macarons are no longer tacky.
- Preheat your oven to 150 degrees C with the oven racks in the top and bottom third of the oven.
Bake the cookies (two sheets at a time) for about 14 - 16 minutes. The Macarons are done when you can just barely separate the cookies from the parchment paper. - Remove from oven and let the Macarons cool completely on the baking sheet placed on a wire rack.
Filling:
- Place the two egg yolks into a sauce pan
- Use a whisk to break it up.
- Add the granulated sugar, whisk until combined.
- Add Yoghurt and drops of lemon juice and mix.
- Place the saucepan on medium heat, cook for a few minutes until a custard consistency.
- Take it off the heat and cool it.
- Add unsalted butter at room temperature.
- Whisk.
- Place it into a pastry bag. Chill it in the fridge.
Assembly of Macarons:
- To assemble the Macarons, take two cookies and sandwich them together with your filling (place filling on flat side of cookie).
- Popular choices are a Swiss buttercream frosting, lemon curd, chocolate ganache, jam, or dulce de leche (Caramel).
- While you can serve the Macarons the day they are made, these cookies really need to mature for a day or two in the refrigerator. Best served at room temperature.
9:05 PM
No comments
Ramen - Ippudo Singapore
Akamaru Tamago Ramen $18.90
This is the second time I am solo lunching at this branch of Ippudo in Singapore. I am trying the Akamaru (red) soup base. I really like the pork belly chashu that is made using a time honoured technique where the pork belly chashu undergoes a process of repeated and gradual slow-simmering in a special soya sauce-based braising liquid that saturates the tender chashu to its core. Every time I eat their chashu, it is always mouth-watering and succulent melt-in-your-mouth umami pork slices.
The portion is still considered quite small in my personal opinion. It is possible to upsize with additional noodles if you want at cost. Instead, I added a side of 5 pcs pan-fried gyoza with Mentai Mayo (S$10.90). I will post the food photo in my next post.
4:28 AM
No comments
My friend Angie recommended me to this Torched Salmon Belly Mentai Yaki. It is one of the best introduction to be back into the Singapore's food scene. I like Japanese cuisine for a few reasons. At first I didn't even noticed this question until my purchase of 3 Bento Box sets for my family during our move back to Singapore two months ago. My husband asked me why I like the Japanese food? I said after much thoughts that I think visually I think the Japanese are the best people in the world to package their products and services.
I personally also made experiments with regards to user experiences on the healthy portion of food consumed when it is prepared well, versus the portion and enjoyment for same food prepared and served in different manner.
I did this out of personal curiosity, however, a little bit on reasons that I am a UX designer.
Torched salmon sushi -Salmon Belly Mentai Yaki
7:50 PM
No comments
Bubur Pulut Hitam
This is ready to be cooked raw Black Glutinous Rice grains which I've bought at the wet market. I have soaked them overnight with water. Now it is in a pot, going through a slow cooking process of about 90 minutes.
This is the first attempt as I have never made this at home. Usually I just pick it from the menu from one of the hawker food centres or food court or restaurant. I am following this video recipe:
5:49 PM
No comments
Cinnamon Rolls
In Tallinn Estonia, I have made Cinnamon Rolls but this is the first time to make them in Singapore. The best part about making my own Cinnamon Rolls is that I can control the amount of sugar added. I prefer not-too-sweet Cinnamon Rolls if I can have it my way. I like this recipe as it is really soft and fluffy in the inside as I am using Bread flour. I am absolutely happy with the results:
INGREDIENTS:
Dough:
- 4 cups of bread flour
- 1/2 cup granulated sugar
- 3/4 tsp fine sea salt
- 1/3 cup butter
- 1 cup lukewarm milk
- 7g instant yeast
- 3 eggs
Filling:
- 1 cup sugar
- 17g cinnamon powder
- 1/3 cup butter
Glaze:
- 3/4 cups powdered sugar
- 3 Tbsp milk
INSTRUCTIONS:
Method:
- In a large mixer bowl, whisk together bread flour, granulated sugar, and fine sea salt.
- Add in softened unsalted butter. Blend in using a spatula
- In a separate container, whisk together lukewarm milk and instant yeast.
- Add in yeast mixture, eggs, mix for 3 minutes.
- On a lightly floured work surface and knead for 1 minute. Plop into a greased bowl and cover with plastic wrap, let rise for 1.5 hour.
- Once dough is ready, mix together sugar and cinnamon.
- Place dough out onto a lightly floured surface flattening it into a large rectangle.
- Spread softened unsalted butter across the whole rectangle then sprinkle the cinnamon sugar evenly across the whole dough.
- Tightly roll from the bottom all the way to the top. Slice into 2” thick segments
- Grease a baking dish or round pan, line the bottom of the pan the rolls and cover with a damp cloth. Let rise at room temperature for 45 minutes.
- Bake in a 190 Degree Celsius preheated oven for 20 minutes. Let cool in the container for 15 minutes.
- For the filling, powdered sugar and milk blend with a mini whisk until smooth.
- Drizzle the glaze on top of the cinnamon rolls and serve.
4:20 AM
No comments
First make the pasta base with ingredients: Flour, Yeast, Water, Olive Oil, Honey, Salt.
Add 5g of yeast to one teaspoon of honey, add 3 tablespoon of warm water, mix it and let it react for 10mins.
When mixture becomes fluffy, you can add 500g of flour, pinch of salt and mix them well.
When it become crumbly add water and knead it for 20 minutes, until it becomes the dough.
Let it rest for 30 minutes and punch down the puff up pasta and divide it into two parts.
Roll it down to two doughs (one for each pasta base).
Add oil and let it rest for another hour.
Flatten it with your palm or roll it to the thickness you like, adding some flour every now and then so it won't stick to your hands.
For the pasta sauce :)
Ingredients: Onions, Tomatoes puree, oregano, salt.
With two large onions, diced them and fry in olive oil til translucent.
Add one can of Pomodoro sauce (Italian tomatoes are longish types, very juicy and delicious) :)
Add half a cup of water and simmer til the fragrant of the pizza sauce fills your entire kitchen :)
Add fresh oregano and salt. Let it cool down before adding to the pizza base.
Add toppings: in this pizza photo above, Hungarian (Kolbasz) Smoked Sausage, Trappista Cheese, bio tomatoes, purple onions, some minced garlic, green chilli (sliced), and the final very important ingredient is Szalonna. Szalonna is Hungarian for fatback made of smoked pork fat with the rind and is traditional in Hungarian cuisine. You are free to top it with whatever you prefer too.
Bake it for 12 mins at 200 deg Celsius, when ready, serve. And enjoy!
If you would to see how to make the dough from scratch with raw ingredients, here's a video to share:
Pizza dough from scratch:
This pizza was made with totally BIO ingredients straight from the garden in the backyard, a 'first' pizza for my Aunt-in-law and Uncle-in-law to taste at their home. The highlights of this pizza is the green chilli that is super spicy & home-grown by Erzsike's hubby (Feri). The Scoville scale (a measurement of the pungency (spiciness/heat of pepper) of chili peppers) can match those of Thai Chili Padi (Bird's eye chili) so around 50,000 - 100,000 Scoville units, which is at the lower half of the range for the hotter habanero but still many times more spicy than a jalapeño.
10:07 PM
No comments
Have you wondered how to bake donuts and enjoy these super soft and fluffy donuts?
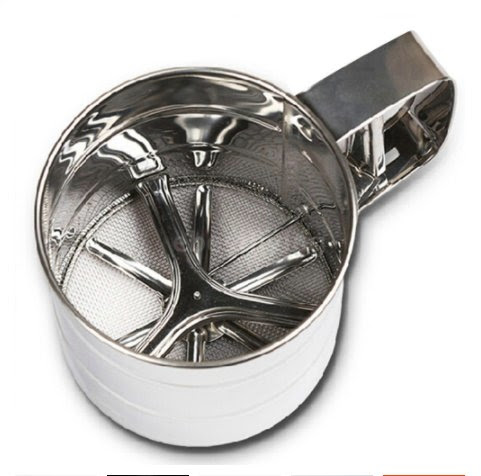
I am using a six-cavity donut baking pan. This version of donut was made with home-made yoghurt, waffle batter and 20g of melted butter. I just mixed the wet and dry ingredients, set them in the donut baking pan, set my oven to 190 deg C and baked for about 15 minutes. The toppings is simply icing sugar which I use a stainless Steel Mesh Flour Sifter Mechanical Baking Icing Sugar Shaker gifted from my friend Ruyi:
Baking Icing Sugar Shaker
P.S. I still have a few other new tools which I've bought and still brand new and unused.
11:15 PM
No comments
I made these today. Braised Pork Belly Buta No Kakuni 豚の角煮. Some people might find it sinful to eat these layers of fat. I thought I am the sinful one. However, I realised many people actually like this. Here in Singapore I like the Teochew style of preparing it. I also like the Taiwanese way, called 卤肉饭. And I also like the Japanese way, to cook it with Sake and dashi. I know in UK the Britons eat it too. In Hungary they eat it with a different preparation called szalonna, or Füstölt-főtt (Smoked), mostly when I was living in Budapest, I like to eat the pork knuckle (it is called sült csülök). And I supposed in Germany they eat it too, Schweinshaxe (Pork Hock) with Beer Gravy. Do you eat it in your country (or city)? Let me know!
Hungary: Sült csülök téli zöldségekkel és pikáns sült oldalas - Borbás Marcsi szakácskönyve
4:57 AM
No comments
Chocolate and vinal marble cupcakes are delicious, moist, and fluffy. Topped with homemade chocolate buttercream, these cupcakes have beautiful vanilla and chocolate swirls that are visually appealing.
Preparation time: 15 minutes
Cooking time: 20 minutes
Total time: 35
minutes
Yield: 12
cupcakes
Ingredients
For the cupcake:
1 cup Self Raising Flour
¼ cup cocoa powder
¾ cup sugar
¾ cup unsalted butter, softened
3 eggs, at room temperature
3 tbsp full-fat milk
½ tsp vanilla extract
For the frosting:
2/3 cup Unsalted Butter, softened
½ cup Cocoa Powder
2 cups Icing Sugar
2 tbsp Boiling Water
For toppings:
Chocolate chips
Sprinkles
Preparation
For the cupcake:
1.
In an electric mixer bowl, add
softened butter and sugar. Start whisking at medium speed for about 2 minutes
or until the two ingredients are combined, and you get a soft mixture.
2.
Add eggs, one at a time, and
continue to whisk at medium-low speed.
3.
Now slowly add swift
self-rising flour and continue to whisk until you get a smooth batter. Make
sure you don’t over whisk the batter.
4.
Divide the batter into two
equal parts.
5.
Add vanilla extract in one part
and gently fold. Set aside.
6.
Add cocoa powder and full-fat
milk to the other part and gently fold using a spatula. You can also use the
electric mixer to beat the chocolate batter. If the batter seems a little
thick, you can add some more milk. However, keep an eye so that it doesn’t get
runny.
7.
Prepare the muffin tray by
placing cupcake cases in them.
8.
Start scooping about a tablespoon
of the vanilla batter and pour it into each cupcake case.
9.
Then pour a tablespoon of the
chocolate batter, followed by the vanilla batter, until the cupcake cases are
filled two-third with the batter.
10.
Place the muffin tray in a
preheated oven at 350-degree F for 20 minutes. Once the time is up, insert a
toothpick to check the doneness. If it comes out clean, the cupcakes are ready.
If it is wet, give three more minutes in the oven.
11.
Once done, take the muffin tray
out of the oven and let the cupcakes cool down on a cooling rack.
For the frosting:
12.
Meanwhile, in an electric mixer
bowl, add butter and beat until it is smooth.
13.
Add about half of the icing
sugar and continue to beat at medium speed. Once it incorporates well, add the
remaining icing sugar and beat.
14.
Add cocoa powder and continue
to beat for 3 minutes until the mixture is fluffy and light.
15.
Fill the piping bag with the
chocolate buttercream and place it in the refrigerator until the cupcakes are
cool.
For toppings:
16.
Using a star tip, pipe the
chocolate buttercream on each of the cupcakes. Decorate with white or milk
chocolate chips and sprinkles. You can also drizzle chocolate syrup on top.
17.
Enjoy!
You can pack these homemade marble cupcakes
in bakery boxes uk, kraft cupcake boxes, kraft cake boxes or corrugated cake boxes. These are made
with sustainable material which is recyclable. Then finish off by adding handmade
with love stickers tag with notes, and turn these cupcakes into amazing
little creations from the outside in. This is great for events or parties or
small cake businesses who want to add that personal touch to their cakes,
cupcakes, muffins, brownies, cookies and many other baked products.
3:38 AM
No comments